Low-latency Full-HD video streaming from Raspberry Pi
Raspberry Pi boards are getting more and more widespread. But when it comes to real-time video streaming, you may find yourself lost in a bunch of long-reptile shell commands! In this post, I will give you some crystal clear instructions to receive a low-latency stream from a CSI or USB camera. They key to achieve this is to do the h264 encoding on the RPi GPU (not CPU). The stream is then received frame-by-frame in an OpenCV code. You can later add text, layers, or do any other process you wish.
1. CSI camera
I generally recommend to use CSI cameras with Raspberry Pi because they are directly captured by the GPU. This means that the CPU remains free for other operations. You may find the official CSI cameras unsuitable for your project. If this is true, then check ArduCam. They have a wide variety of board cameras with different sensors and lenses.
Supposing that you want to stream from an RPi to an Ubuntu Laptop:
1- Install GStreamer in the laptop using:
sudo apt -y install libgstreamer1.0-dev libgstreamer-plugins-base1.0-dev
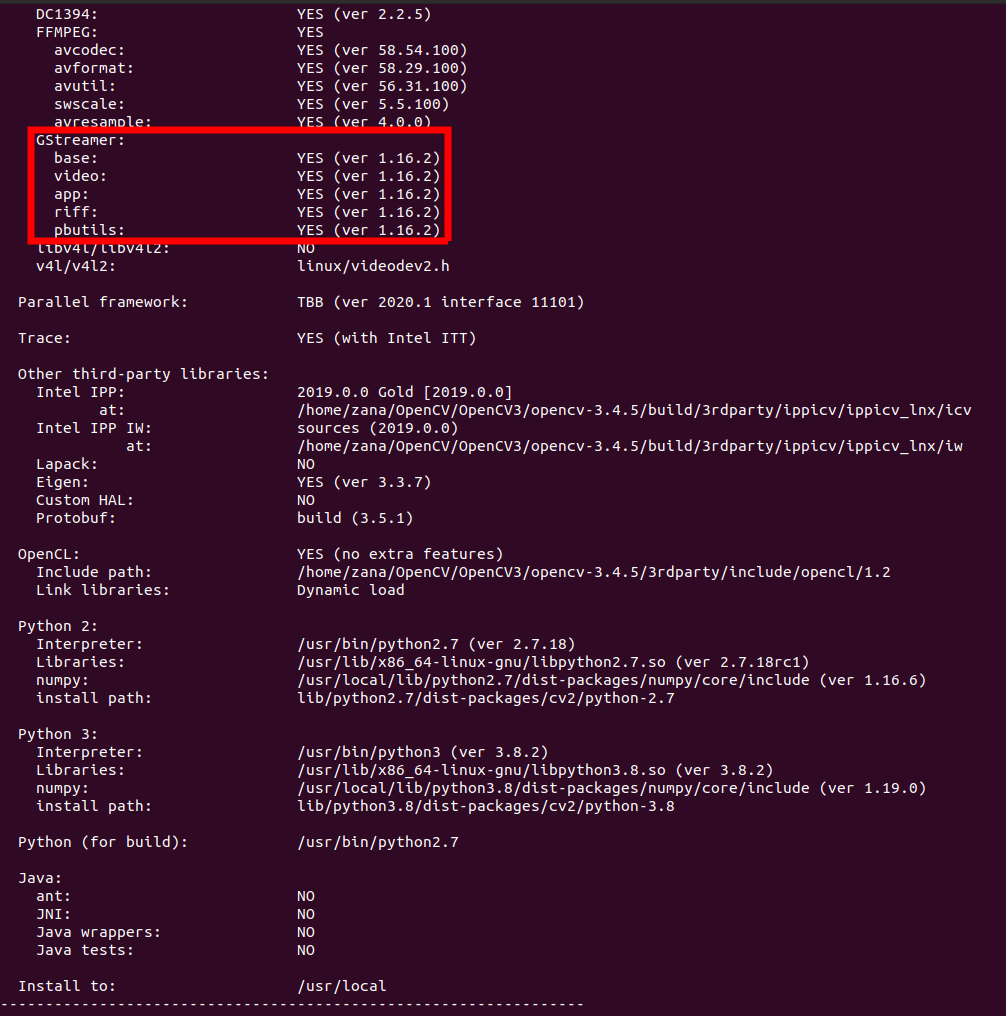
2- In the laptop, re-compile your OpenCV with -DWITH_GSTREAMER=ON flag in CMake. Make sure your new OpenCV recognizes gstreamer:
3- In the RPi, install gst-rpicamsrc
sudo apt-get install autoconf automake libtool pkg-config libgstreamer1.0-dev gstreamer1.0-tools

git clone https://github.com/thaytan/gst-rpicamsrc.git

cd gst-rpicamsrc

sudo ./autogen.sh --prefix=/usr --libdir=/usr/lib/arm-linux-gnueabihf/

sudo make -j4

sudo make install
4- Back in the laptop, build and run this code:
#include <opencv2/opencv.hpp>

using namespace cv;

int main()
{
    VideoCapture cap("udpsrc port=5000 ! gdpdepay ! rtph264depay ! avdec_h264 ! videoconvert ! appsink sync=false");

    Mat frame;
    while (cap.isOpened())
    {
        cap >> frame;

        if (frame.empty())
            continue;

        imshow("Stream", frame);

        if (waitKey(1)=='q')
            break;
    }

    cap.release();
    return 0;
}
5- And last, in the Rpi run this command (replace host IP with your laptop’s IP):
gst-launch-1.0 rpicamsrc bitrate=6000000 ! 'video/x-h264,width=1920,height=1080' ! h264parse ! queue ! rtph264pay config-interval=1 pt=96 ! gdppay ! udpsink host=10.42.0.1 port=5000
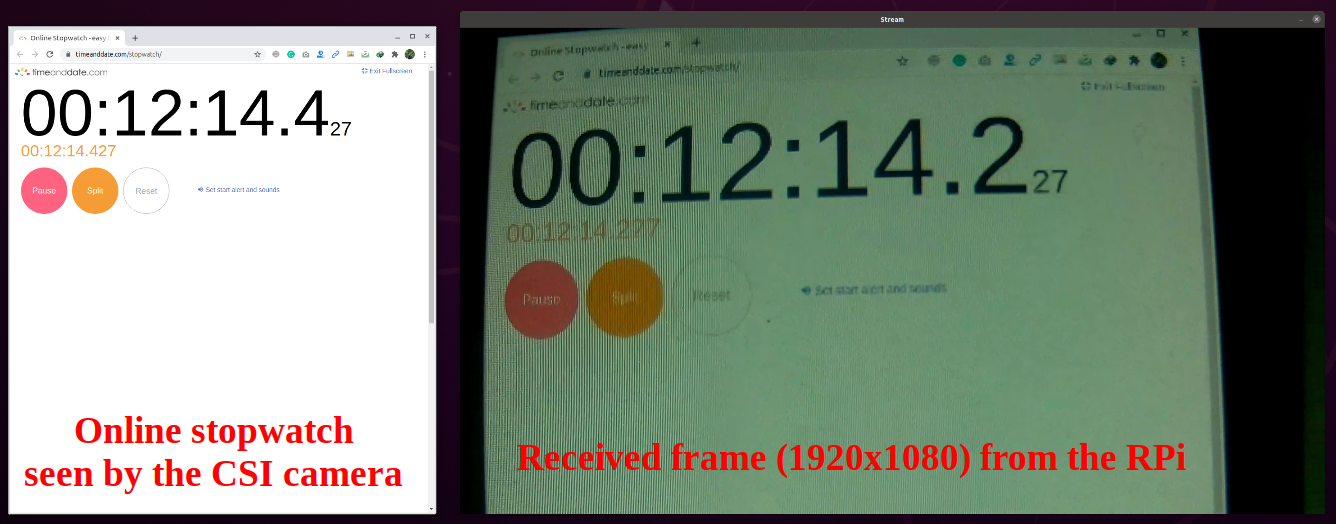
To check the latency, I put the camera in front of a stopwatch and then captured an image by my cellphone. The camera sees 00:12:14:427 but shows 00:12:14:227. This means 200ms latency which is good for 1920×1080 resolution. Note that RPi CPU usage is below 5% and you can use it for other tasks. You can also increase bitrate to get a higher quality stream if your Laptop’s CPU is powerful enough to render the frames.
2. USB camera
USB cameras are more available than CSI’s. As I said, I don’t recommend them with RPi but in case you don’t have access to a CSI camera or want to save your budget by using an old webcam, then this section is for you.
Supposing that you want to stream from an RPi to an Ubuntu Laptop:
1- Make sure your laptop’s OpenCV support FFMpeg.
2– In the Rpi, build FFmpeg with h264 GPU encoding flags:
git clone https://github.com/FFmpeg/FFmpeg.git

cd FFmpeg

sudo ./configure --arch=armel --target-os=linux --enable-gpl --enable-omx --enable-omx-rpi –enable-nonfree

sudo make -j4

sudo make install
3– Back in the laptop, build and run this code (replace the IP with your laptop’s IP):
#include <opencv2/opencv.hpp>

using namespace cv;

int main()
{
    VideoCapture cap("udp://10.42.0.1:5000");

    Mat frame;

    while (cap.isOpened())
    {
        cap >> frame;

        if (frame.empty())
            continue;

        imshow("Stream", frame);

        if (waitKey(1)=='q')
            break;
    }

    cap.release();
    return 0;
}
4– And last, in the Rpi run this command (replace the IP with your laptop’s IP):
ffmpeg -s 1280x720 -i /dev/video0 -codec:v h264_omx -b:v 2048k -f mpegts udp://10.42.0.1:5000
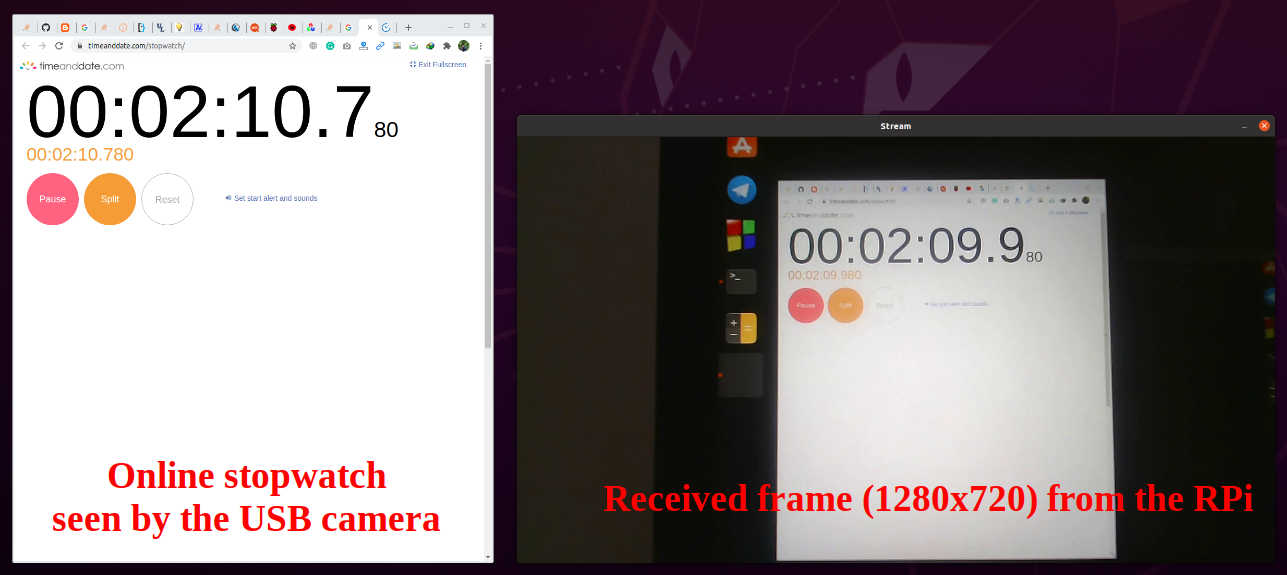
Repeating the same stopwatch test shows that the USB camera has more latency (around 800ms). But I must mention that a part of this latency is due to my camera which provides only 10 FPS at HD resolution. Also, note that the RPi CPU is used more (17%) in this case because the frames are captured by the CPU and only the encoding is handled by the GPU. With a CSI camera, both capturing and encoding were handled by the GPU.
Leave a Reply
Want to join the discussion?Feel free to contribute!
Hi Zana, this article is really helping me stream the video from my Pi 4. But I’m not able to play it with VLC on a Windows box. Are you able to help me with this?
I tried:
udp://@:5000
rtp://@:5000
with :demux=h264 and without but none of them seem to work.
Thanks
Hi
Honestly, I didn’t test it with VLC. Regarding Windows, I don’t think that it requires something different than Linux because OpenCV, FFmpeg, and Gstreamer are all cross-platform libs.
Just make sure you have installed them and you are using the correct IPs. My Linux IP was 10.42.0.1 and I used port #5000 but you can use other ports too. Btw, If you can see the frames on your laptop via cv::imshow, then you can use cv::VideoWriter to save them as a video and later play it by VLC or any other video player.
Not to ask a dumb question (I’m not a coder), I’d like to build this because I’m looking for a low latency solution for streaming from the Pi to a laptop. When you say “Back on the laptop build and run this code”, what exactly does that mean? What app do I use to build that, how do I run it etc? Again, sorry if that’s basic. I’m using windows 10.
Thanks
Hi David.
Your question (as someone with no coding experience) is not dumb at all. The code below the section “Back in the laptop build and run this code”, is a C++ code that uses OpenCV library. To run this code (and generally every other C++ code), we have to first build it. This can be done by MinGW on Windows. So make sure you have it installed on your machine. The next step is to build the OpenCV library. This is not easy enough to be explained in a comment. I’ve mentioned the instructions for Linux here but since you are using Windows, I would suggest to read this post.
Do you know a solution how to stream this to a web server on the Pi? I don’t want to use any software just open the ip in my browser. I’ve tried with a Python web server and the picamera library but that gives me a very poor frame rate. Any ideas?
Good post tho
Hi David
I’ve no idea how to receive the stream in a browser. I hope someone here will give you a hint
You could definitely run the given code from Zana, send it to a server (i.e. another raspberry pi, more powerful is better though, like 3b+) transcode it from UDP to HLS or for lower latency the new LL-HLS then you get something like playlist.m3u8 which you can make available through an apache or nginx webserver (on the raspberry pi) to the network and then request the stream in normal HTML through the tag. This is rather complicated but one of the only solutions I can think of.
If you want to implement P2P streaming so from the camera directly to your phone or PC, you can just install an “IP cam viewer” and enter the according URL.
Hi Zana,
I was searching for a method to stream RPi cameras with low latency and came across your blog. It was very helpful for me!
I just wanted to mention, for streaming the camera, this command also works fine:
‘raspivid -t 0 -w 800 -h 600 -fps 30-hf -vf -b 50000000 -o – | gst-launch-1.0 -e -vvvv fdsrc ! h264parse ! rtph264pay pt=96 config-interval=1 ! udpsink host=xx.xx.xx.xx port=5000’
Hi Farzad. Thank you very much for sharing
Hi Farzad! Do you know how to connect to the stream using VLC once I run the command you suggested? Thanks!
Hi Zana
What was the version of raspicam you used in first section of your test (csi)?
I don’t remember to be honset. But since that post has been publishes at NOVEMBER 5, 2020 and since I have used
git clonefor getting the raspicam, you can find the latest available version at that time by checking their github repo.Hi Zana! Thanks for your tutorial!
Rpi newbie here :D
What hardware used in your tutorial?
Is zero w ( not zero 2 w) capable of doing 640×480 at 25 fps and <100 ms latency?
Hi. Glad to see you like the post!
I used Rpi3B+. Since the encoding is done on GPU, you should get similar results to what I’ve reported because zero w and 3b+ have the same GPU
For some reason I get “failed” on this step: sudo ./autogen.sh –prefix=/usr –libdir=/usr/lib/arm-linux-gnueabihf/
So I had to also install libgstreamer-plugins-base1.0-dev.
This is just in case someone will get similar error
full log is here https://pastebin.com/tnrB9RbS
I can’t get it to work :(
when i launch code on my laptop and then on pri, i get error on rpi : https://pastebin.com/g1VAgdMF
and this on laptop: https://pastebin.com/UHYkPUf3
Hello, after running “sudo ./autogen.sh ……” I get error saying that I have to install or upgrade Gstreamer development packages. I have them already and versions are 1.22. Too new?
Thank you