Object trackers you deserve!
You want to continuously detect an object but your object detection algorithm fails to do so in some frames. The easiest way to solve the issue is neither training the detector with more data nor using a fancier detection algorithm. Clone this code and read the post to see how adding a good tracker will give you cleaner outputs with higher FPS!
1. A brief history of object tracking
Object tracking is an old problem in computer vision. Early algorithms used variants of Kalman filter to predict the location of the target in the next frame using a motion model (e.g. constant velocity). These algorithms (example) are very fast and can handle occlusions but you have to feed them frequent detections otherwise the filter does not converge and the target is lost very soon. Because of this, another set of algorithms were invented by the community that used image information instead of motions. The so-called “appearance-based” methods are broadly divided into “generative” and “discriminative” models.
Generative algorithms describe the target by global descriptors and look for a patch in the next frame that has the nearest descriptor with the target. An example of this set of algorithms is the famous Mean-Shift algorithm which uses image histogram to describe the patch. Despite easy implementation and fast speed, such algorithms will easily lose the target under occlusion, changing light, and deformations.
Discriminative methods, on the other hand, use a classifier (e.g. AdaBoost, SVM, etc.) to discriminate the target from the background. The classifier is trained online with few positives (target patch + small translation, rotation or scaling) and negative data. As new frames come, the classifier is updated to cope with changes in the target shape or light. These methods are generally known to be more accurate than generative methods but slower due to the time-consuming tasks of training the classifier and inference. Recently, correlation filters have shown very promising results thanks to their faster execution in Fourier domain. The basic idea is to estimate an optimal image filter such that the filtration with the input image produces a Gaussian shape response centered at the target location, so the score decreases with the distance. In the next sections, we will test two powerful correlation-based trackers.
2. Multi-scale MOSSE
Minimum Output Sum of Squared Error (MOSSE) is a super fast correlation-based tracker introduced in 2010. It applies random affine transformations to the target patch to generate eight small perturbations of it as training input (fi). The training outputs (gi) are also generated with their peaks corresponding to the target center. What MOSSE does is to find a filter h that minimizes the sum of squared error between the actual output of the convolution (f*h) and the desired output of the convolution (g). Recalling that convolutions become simple and fast element-wise multiplications in the Fourier domain, MOSSE’s final equation comes down to this form:
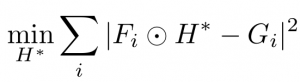
where Fi, Gi, and Hi are Fourier transforms of fi, gi, and hi respectively. The ⊙ symbol denotes element-wise multiplication and ∗ indicates the complex conjugate.
OpenCV 3.4 (and above) has implemented MOSSE. Despite its fast execution, the algorithm is not multi-scale and the bounding box size remains fixed when the target comes closer or goes farther. Fortunately, the multi-scale version of MOSSE has been implemented in Dlib. Install the library by:
sudo apt-get install build-essential cmake pkg-config
sudo apt-get install libx11-dev libatlas-base-dev
sudo apt-get install libgtk-3-dev libboost-python-dev

git clone https://github.com/davisking/dlib.git
cd dlib
mkdir build
cd build
cmake ..
cmake --build . --config Release
sudo make install
sudo ldconfig
Then use the dlib’s correlation_tracker like this:
#include <iostream>
#include <opencv2/opencv.hpp>
#include <dlib/image_processing.h>
#include <dlib/opencv/cv_image.h>

using namespace std;
using namespace cv;
using namespace dlib;

int main()
{
    VideoCapture cap("video.mp4");

    Mat frame;
    bool do_detection = true;

    correlation_tracker tracker;

    while (cap.isOpened())
    {
        cap.read(frame);

        if (frame.empty())
            break;

        if (do_detection)
        {
            //Apply your detector here

            if (detectionConfidence > 0.5)
            {
                array2d<rgb_pixel> dlib_img;
                assign_image(dlib_img, cv_image<bgr_pixel>(frame));

                tracker.start_track(dlib_img, drectangle(x1,y1,x2,y2));

                cv::rectangle(frame, Point(x1,y1), Point(x2,y2), Scalar(0,255,0), 3);

                do_detection = false;
            }
        }
        else
        {
            array2d<rgb_pixel> dlib_img;
            assign_image(dlib_img, cv_image<bgr_pixel>(frame));

            double res = tracker.update(dlib_img);

            if (res > 10)
            {
                drectangle pos = tracker.get_position();
                cv::rectangle(frame, cv::Point(pos.left(), pos.top()), cv::Point(pos.right(), pos.bottom()), Scalar(0,255,0), 3);
            }
            else
            {
                do_detection = true;
            }
        }

        imshow("Frmae", frame);

        char key = waitKey(1);

        if (key == 'q')
            break;
    }

    cap.release();

    return 0;
}
The frames are read from OpenCV’s VideoCapture object and the object detector is applied to each frame. You can use any detector you want. I used a pre-trained SSD model from Caffe. The model architecture and the network weights are included in the GitHub repo. Once an object is detected, the tracker is initialized by start_track function. Note that before calling this function, we must convert OpenCV’s Mat to Dlib’s array2d type. This is done via assign_image function. Once the tracker is initialized, all subsequent frames are passed to it to find the new location of the object. If the tracking quality is below a threshold (here: 10), the object detector is called again in the next frame. Otherwise, tracking continues. See how it performs on a quad-core i7 CPU @ 2.6GHz. The bounding box sticks well to the captain’s Haddock face.
3. Kernalized Correlation Filter (KCF)
What makes KCF a good tracker is the way it collects positive samples to train the correlation filter. KCF applies cyclic shifts to the target patch (look at the vertical shifts in the figure) and then represents the data by a circulant matrix (C) which allows multiple simplifications in subsequent computations. Also, KCF uses the same famous Kernel trick in SVM to do correlation filter in a non-linear space. Putting all these things together, we can conclude that KCF is both faster and more accurate than other correlation-based trackers.

OpenCV v3.1 (and above) has implemented KCF but it’s not multi-scale (link). Here is a multi-scale implementation but it doesn’t report track failures. With some small modifications, we can add this important feature to it. First clone the repo:
git clone https://github.com/joaofaro/KCFcpp.git
Then replace the “update” function in kcftracker.cpp file with this one:
cv::Rect KCFTracker::update(cv::Mat image, bool &status)
{
    if (_roi.x + _roi.width <= 0) _roi.x = -_roi.width + 1;
    if (_roi.y + _roi.height <= 0) _roi.y = -_roi.height + 1;
    if (_roi.x >= image.cols - 1) _roi.x = image.cols - 2;
    if (_roi.y >= image.rows - 1) _roi.y = image.rows - 2;

    float cx = _roi.x + _roi.width / 2.0f;
    float cy = _roi.y + _roi.height / 2.0f;


    float peak_value;
    cv::Point2f res = detect(_tmpl, getFeatures(image, 0, 1.0f), peak_value);

    if (scale_step != 1)
    {
        // Test at a smaller _scale
        float new_peak_value;
        cv::Point2f new_res = detect(_tmpl, getFeatures(image, 0, 1.0f / scale_step), new_peak_value);

        if (scale_weight * new_peak_value > peak_value)
        {
            res = new_res;
            peak_value = new_peak_value;
            _scale /= scale_step;
            _roi.width /= scale_step;
            _roi.height /= scale_step;
        }

        // Test at a bigger _scale
        new_res = detect(_tmpl, getFeatures(image, 0, scale_step), new_peak_value);

        if (scale_weight * new_peak_value > peak_value)
        {
            res = new_res;
            peak_value = new_peak_value;
            _scale *= scale_step;
            _roi.width *= scale_step;
            _roi.height *= scale_step;
        }
    }

    if (peak_value < 0.3)
        status = false;
    else
        status = true;

    // Adjust by cell size and _scale
    _roi.x = cx - _roi.width / 2.0f + ((float) res.x * cell_size * _scale);
    _roi.y = cy - _roi.height / 2.0f + ((float) res.y * cell_size * _scale);

    if (_roi.x >= image.cols - 1) _roi.x = image.cols - 1;
    if (_roi.y >= image.rows - 1) _roi.y = image.rows - 1;
    if (_roi.x + _roi.width <= 0) _roi.x = -_roi.width + 2;
    if (_roi.y + _roi.height <= 0) _roi.y = -_roi.height + 2;

    assert(_roi.width >= 0 && _roi.height >= 0);
    cv::Mat x = getFeatures(image, 0);
    train(x, interp_factor);

    return _roi;
}
Then, edit the function signature in kcftracker.hpp
// Update position based on the new frame
virtual cv::Rect update(cv::Mat image, bool &status);
and also in tracker.h:
virtual cv::Rect update( cv::Mat image, bool &status)=0;
Then use the KCFTrackerlike this:
#include <iostream>
#include <iostream>
#include <opencv2/opencv.hpp>
#include "kcftracker.hpp"

using namespace std;
using namespace cv;

int main()
{
    cv::VideoCapture cap("video.mp4");

    Mat frame;
    bool do_detection = true;

    KCFTracker tracker;
    tracker.setParams(true, true, true, false);

    while (cap.isOpened())
    {
        cap.read(frame);

        if (frame.empty())
            break;


        if (do_detection)
        {
            //Apply your detector here

            if (detectionConfidence > 0.5)
            {
                tracker.init(Rect(x1,y1,x2-x1,y2-y1), frame);

                cv::rectangle(frame, Point(x1,y1), Point(x2,y2), Scalar(0,255,0), 3);

                do_detection = false;
            }
        }
        else
        {
            bool status;
            cv:: Rect trackedObj = tracker.update(frame, status);

            if (status)
                rectangle(frame, trackedObj, Scalar(0,255,0), 3);
            else
                do_detection = true;
        }

        imshow("Frmae", frame);

        char key = waitKey(1);

        if (key == 'q')
            break;
    }

    cap.release();

    return 0;
}
The logic behind this code is exactly the same as the one mentioned for Dlib. The syntaxes are a little different though. Compared to Dlib’s correlation tracker, KCF works almost two times faster.
4. Let’s make a faster tracker
The two mentioned trackers are good to use if you run them on a laptop or desktop computer. But they are too slow for real-time execution on ARM CPUs especially if you want to track multiple objects. The good news is that there are other ways too to make a tracker. If we extract FAST keypoints from the target and track them by KLT algorithm, we can estimate a similarity transformation between the target’s points and the tracked points. Given this transformation, the target box can be mapped to the new frame. And because both FAST and KLT algorithms are not complex, and their implementations in OpenCV are well vectorized, we expect this tracker to be super fast compared to KCF or Dlib’s tracker. BINGO!
![]()
I have implemented the interface of this tracker very similar to that of KCF. You can see the full code in the GitHub repo. It runs at 200-250 FPS while KCF works at 15-200. The difference will be larger if you run them on an ARM CPU.
But wait! If such a simple and fast solution exists, then why people have developed those complex trackers? The answer is:
- Some objects (specially far objects that appear small) might have poor textures. This means that FAST might not be able to detect enough points. Even if enough keypoints would be detected (by lowering FAST threshold which makes it much slower), the information content around each keypoint is poor and might lead to wrong tracks from KLT. MOSSE and KCF perform much better in such scenarios because their classifier describes the target as a whole object rather than a set of keypoints.
- Occlusions can easily fool the tracker. If the target object is partially hided by another object, some of the detected keypoints would belong to that non-target object. These outliers are then tracked by KLT and enter the process of estimating the similarity matrix. The RANSAC algorithm built-in the estimatePartialAffine function can reject these outliers but not in all scenarios. RANSAC is able to do this only if the majority of the tracked points would be inliers. Otherwise, the estimated similarity matrix would be wrong and the target object is lost. MOSSE and KCF are also prone to occlusion errors but they do a better job by learning from previous frames.
5. Summary
In this post, we reviewed different object tracking approaches and introduced two open-source trackers with good accuracy and efficiency. We also proposed a simpler but much faster tracker for ARM CPUs that gives acceptable accuracies in cases where the target has a relatively good texture and is not occluded heavily by other objects. You can access the codes of these trackers here and add them to your own projects.
Leave a Reply
Want to join the discussion?Feel free to contribute!
Great job Zana. Do you happen to have this in python?
Thanks Saeed. Honestly, I’m not a Python coder. But you can use the python API of the Dlib library for running the multi-scale MOSSE tracker. For the multi-scale KCF, there is a Python wrapper here but you should change small parts so that your tracker can report failures. I have explained the details of this for the CPP code. I don’t think it would be hard to do the same for the Python wrapper. The FAST-KLT tracker however requires more work. You have to replace the OpenCV CPP functions with their python versions plus some object-oriented programming.
Hi, Zana. I’m porting your fast_klt C++ tracker to Python, but I’m having trouble following you without code documentation. I’m having trouble grasping the idea behind the void FastKltTracker::keepStrongest (line 160 of main/fast_klt/FastKltTracker.cpp) function.
It seems you sort the keypoints calculated by FAST and then erase them based on a threshold (or pivot), but I’m not sure since std:: nth_element is not quite clear for me in this context. Can you give me a little bit more details of this operation? What’s the criteria to sort the keypoints (it seems that you sort the vector like this: left side of the pivot: larger than the pivot, left side of the pivot, smaller than the pivot – right?).
Then comes the keypoint filtering, using erase. You seem to delete all the elements starting from the position of the original pivot (now ordered) until the end, is that right? This last bit is confusing me, you are not looking at the actual value of the pivot, but rather, its position… and you delete all the items starting from this position (inclusive) until the end of the vector, I’m not sure why. It would be great if you could explain me a little bit more of the actual idea, so I can translate it to pure Python.
Thanks!
Hi Rich
FAST might detect hundreds of points in a bounding box but estimating the motion between two boxes does not really need many points. We prefer to have fewer BUT strong points because they are easier and more robust for tracking. This is done by keepStrongest function. We sort keypoints based on their response (descending), peak the first N points, and get rid of the others. This kind of sorting (where we are only interested in the first N items and not the others) can be done much faster with std::nth_element function, compared to std::sort. I don’t know the alternative function in python but you can just sort your array of keypoints based on their responses and then peak the first N points. If the speed was not satisfactory, take a look at this link.
Thanks, Zana. The port is (mostly) complete. At least an initial version – I’m still improving it, there are some tricks to reproduce the same functionality within Python (The sorting problem in my previous question, for example, was solved using a Heap Queue algorithm). Here’s the repository: https://github.com/gone-still/fastKLT-tracker
Glad to hear your success Rich. I will mention your repo so that more python-friendly people can use it :)
Thank you