Image classification with pre-trained models using libtorch (Pytorch C++ API)
Deep learning has revolutionized computer vision. There are thousands of Python code snippets to start but few ones in C++. If you like C++ like me and want to deploy your models in edge, then this series of posts are for you. As a gentle introduction, I will explain how to use libtorch to do image classification using pre-trained models. But there will be much more exciting posts in the future ;) Stay tuned.
1. Environment setup
We start by downloading a pre-built version of the libtorch. This version doesn’t allow to use GPUs but we don’t need it for now.
wget https://download.pytorch.org/libtorch/nightly/cpu/libtorch-shared-with-deps-latest.zip
unzip libtorch-shared-with-deps-latest.zip
The next step is to download Torchvision. It is a package from Pytorch which has popular image datasests and model architectures. Unfortunately, its C++ API doesn’t support the use of pre-trained models currently. But there is another way. We import the model in Python, trace it by a random input data, save the JIT traced model, and load it in our C++ code. To install torchvision:
pip3 install torchvision
2. The code
First of all, let’s save the JIT traced model. I used the pre-trained version of Resnet18. You can check other models here.
import torch
import torchvision

# An instance of your model.
model = torchvision.models.resnet18(pretrained=True)
model.eval()

# An example input you would normally provide to your model's forward() method.
example = torch.rand(1, 3, 224, 224)

# Use torch.jit.trace to generate a torch.jit.ScriptModule via tracing.
traced_script_module = torch.jit.trace(model, example)

# Save the model
traced_script_module.save("traced_resnet_model.pt")
Run the above code and make sure the .pt file has been generated. It’s time to dive into the C++ code:
#include <iostream>
#include <fstream>
#include <chrono>
#include <opencv2/opencv.hpp>
#include <torch/script.h>
#include <torch/torch.h>


//Global variables for normalization
std::vector<double> norm_mean = {0.485, 0.456, 0.406};
std::vector<double> norm_std = {0.229, 0.224, 0.225};

//Functions
std::vector<std::string> load_labels(const std::string& fileName);
torch::Tensor read_image(const std::string& imageName);
cv::Mat crop_center(const cv::Mat &img);


//----------------------------------------------------------------------------
//----------------------------------------------------------------------------
int main(int argc, char* argv[])
{
    if (argc!=4)
        throw std::runtime_error("Usage: ./exe modelName modelLabels imageName");

    auto model = torch::jit::load(argv[1]);
    model.eval();

    std::vector<std::string> labels = load_labels(argv[2]);

    std::vector<torch::jit::IValue> inputs;
    torch::Tensor in = read_image(argv[3]);
    inputs.push_back(in);


    auto t1 = std::chrono::high_resolution_clock::now();

    torch::Tensor output = torch::softmax(model.forward(inputs).toTensor(), 1);

    auto t2 = std::chrono::high_resolution_clock::now();
    int duration = std::chrono::duration_cast<std::chrono::milliseconds>( t2 - t1 ).count();
    std::cout << "Inference time: " << duration << " ms" << std::endl;


    std::tuple<torch::Tensor, torch::Tensor> result = torch::max(output, 1);

    torch::Tensor prob = std::get<0>(result);
    torch::Tensor index = std::get<1>(result);

    auto probability = prob.accessor<float,1>();
    auto idx = index.accessor<long,1>();

    std::cout << "Class: " << labels[idx[0]] << std::endl;
    std::cout << "Probability: " << probability[0] << std::endl;

    cv::waitKey(0);

    return 0;
}


//----------------------------------------------------------------------------
//----------------------------------------------------------------------------
std::vector<std::string> load_labels(const std::string& fileName)
{
    std::ifstream ins(fileName);
    if (!ins.is_open())
    {
        std::cerr << "Couldn't open " << fileName << std::endl;
        abort();
    }

    std::vector<std::string> labels;
    std::string line;

    while (getline(ins, line))
        labels.push_back(line);

    ins.close();

    return labels;
}


//----------------------------------------------------------------------------
//----------------------------------------------------------------------------
torch::Tensor read_image(const std::string& imageName)
{
    cv::Mat img = cv::imread(imageName);
    img = crop_center(img);
    cv::resize(img, img, cv::Size(224,224));

    cv::imshow("image", img);

    if (img.channels()==1)
        cv::cvtColor(img, img, cv::COLOR_GRAY2RGB);
    else
        cv::cvtColor(img, img, cv::COLOR_BGR2RGB);

    img.convertTo( img, CV_32FC3, 1/255.0 );

    torch::Tensor img_tensor = torch::from_blob(img.data, {img.rows, img.cols, 3}, c10::kFloat);
    img_tensor = img_tensor.permute({2, 0, 1});
    img_tensor.unsqueeze_(0);

    img_tensor = torch::data::transforms::Normalize<>(norm_mean, norm_std)(img_tensor);

    return img_tensor.clone();
}


//----------------------------------------------------------------------------
//----------------------------------------------------------------------------
cv::Mat crop_center(const cv::Mat &img)
{
    const int rows = img.rows;
    const int cols = img.cols;

    const int cropSize = std::min(rows,cols);
    const int offsetW = (cols - cropSize) / 2;
    const int offsetH = (rows - cropSize) / 2;
    const cv::Rect roi(offsetW, offsetH, cropSize, cropSize);

    return img(roi);
}
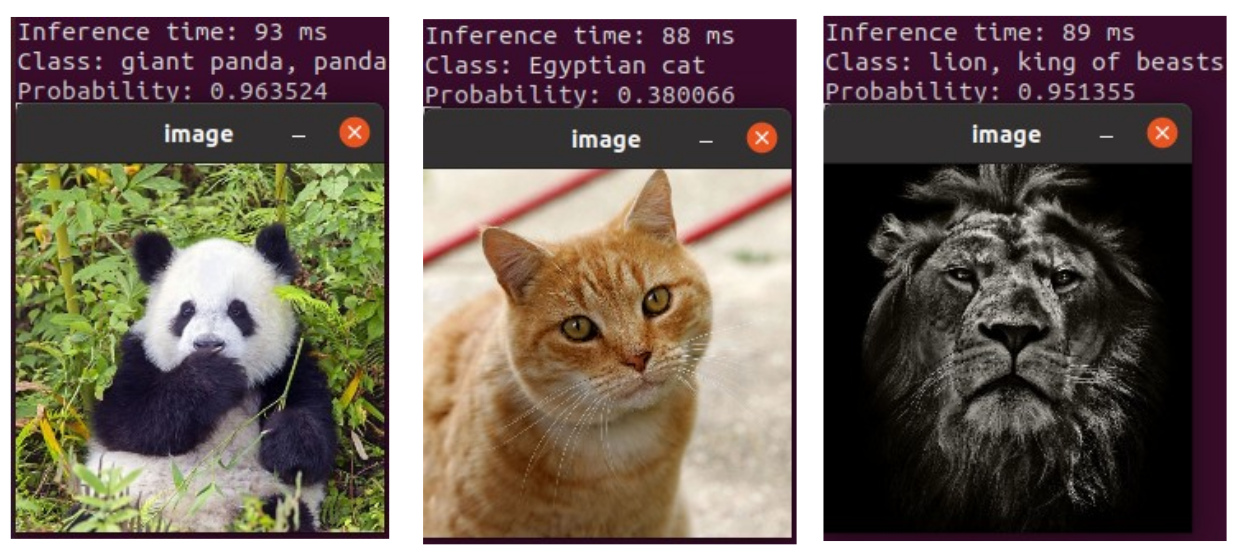
The code is clear but I try to explain some parts. First, the model is loaded in the main() function. To feed an image to this model, we have to save the image in a torch::Tensor variable. This is what read_image() function is responsible for. It uses OpenCV to read the image, crop it in center, resize it to the fixed size of 224×224, and reorder its channels from BGR to RGB. The pre-trained models in Pytorch need the input images to be in the range of [0-1], normalized by mean=[0.485, 0.456, 0.406] and std=[0.229, 0.224, 0.225] . Thepermute function reorders the image from HxWxC to CxHxW which is the standard description of tensors in torch::Tensor type.
The image which is loaded in torch::Tensor is added to a vector of torch::jit::IValue to be prepared for feeding to the model. To have a better sense of the network output, the probabilities are transferred to a range of [0-1] using softmax() function. The highest probability and the corresponding class index are obtained using max() function. Class name is retrieved from a .txt file that contains 1000 class names of ImageNet dataset.
3. Execution
There is only one step remaining. We must build the code and run it.
cmake_minimum_required(VERSION 3.0 FATAL_ERROR)
project(classification)

find_package(Torch REQUIRED)
find_package(OpenCV REQUIRED)
set(CMAKE_CXX_FLAGS "${CMAKE_CXX_FLAGS} -std=c++14 -O3 ${TORCH_CXX_FLAGS}")

add_executable(classify src/main.cpp)
target_link_libraries(classify ${TORCH_LIBRARIES} ${OpenCV_LIBS})
Use the above CMakeLists.txt in the build folder. Give the path of the pre-built libtorch and generate the Makefile. Run the executable by giving the JIT traced model file, label .txt file, and image file respectively.
mkdir build
cd build
cmake -DCMAKE_PREFIX_PATH=/home/zana/Pytorch/libtorch/ ..
make
./classify ../traced_resnet_model.pt ../data/imageNetLabels.txt ../data/panda.jpg
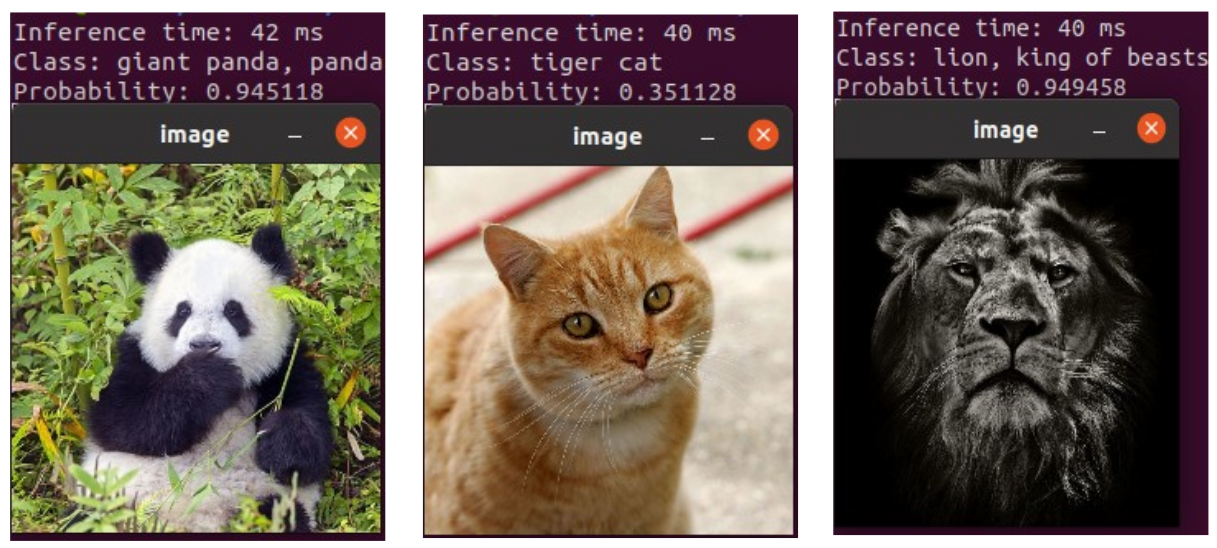
4. Faster Inference with Quantization
Quantization is to replace 32bit float data with 8bit integers. As I have explained before, this reduces memory bandwidth and speeds up computation. It has been proven that quantizing deep neural networks can greatly reduce their runtime without affecting their accuracy too much. Torchvision provides some pre-trained quantized models. The following script shows an example to load quantized Resnet18. Once the model is saved, you can run the same .cpp code and see a 2x performance in inference time.
import torch
import torchvision

# An instance of your model.
model = torchvision.models.quantization.resnet18(pretrained=True, quantize=True)
model.eval()

# An example input you would normally provide to your model's forward() method.
example = torch.rand(1, 3, 224, 224)

# Use torch.jit.trace to generate a torch.jit.ScriptModule via tracing.
traced_script_module = torch.jit.trace(model, example)

traced_script_module.save("traced_qresnet_model.pt")
Leave a Reply
Want to join the discussion?Feel free to contribute!
Hi zana,
Thanks your sharing best post.
1- How I can define torch includes in c++ path?
#include
#include
2-Torch script the only way for using pre-tranied models in c++ api currenlty?
Thanks Ayhan.
1. CMake handles the header files in the code. But if you want to work inside an IDE, then give it the path of the pre-built libtorch. Depending on your IDE, there must be places to give the address of header files (include folder) as well as static and shared libraries (lib folder).
2. To the best of my knowledge, yes
Thanks,
What’s your IDE for opencv c++ and pytorch c++ to simply define path? Where I must to set opencv and pytorch c++ path in your used IDE?
I have some question about comparing c++ and python codes in embedded devices:
I know for computing large operations like matrix , … It’s better to use c++, but suppose I want to do some operations like NMS in detectors or assign ID s and checking some matching boxes for object tracking, Is it better to use c++ or maybe I can same performance with python?
Hi Ayhan
Regarding IDE:
I use Code::Blocks. Go in the “settings->compiler” tab. Then in the “search directories” set the path of header files of your library (either OpenCV or Libtorch). In the “linker settings” set the path of shared (.so) or static (.a) libraries of OpenCV or Libtorch. But if you got issues, don’t waste time on that. Use Code::Blocks (or any other IDE) just as a text editor. Once you think your code is ready, prepare a “CMakeLists.txt” and then use “cmake” command to generate a “Makefile”. Finally build your code with “make” command. You can find exerpts of this routine in my GitHuhb repos.
Regarding Performance:
I think Python can give you a good performance for the tasks you mentioned. But try to use numpy vectorized commands as much as possible. If it didn’t meet your requirements, then go with C++.
just found your blog, it’s very helpful, many thanks
Thanks John. I’m glad you find it useful :)
Amazing posts really impressed with contents especially w.r.t C++
Thanks Zana Zakaryaie ji
Thanks for your kind word Raghuntah. I’m glad you find it useful
hello, thanks for your post.
where is data? (txt file and animal pictures)
Hi
Please check the Github repository:
https://github.com/zanazakaryaie/libtorch_examples/tree/main/image_classification_pretrained/data