Advanced tips to optimize C++ codes for computer vision tasks (II): SIMD
Single Instruction Multiple Data (SIMD), also known as vectorization, is a powerful technique for accelerating computer vision algorithms. In this post, I will explain the concept and then introduce an easy way to use it inside your codes. We will see how we can benefit from SIMD to further reduce the runtime of the Gaussian-blur function that we implemented in the previous post.
1. What is SIMD?
Suppose that you are going to write a code to subtract two images. You have to access the pixels of each image one-by-one, subtract them one-by-one, and then save the pixels in the output image one-by-one.
SIMD allows us to access, subtract and save the output pixels two-by-two, four-by-four, eight-by-eight and etc. (depending on the datatype of the pixels). In other words, 2, 4, 8 and even more subtractions can be performed in one CPU cycle. So, a Single Instruction (here subtraction) can be applied to Multiple Data (here pixels) simultaneously. Note that this is not multi-threading. SIMD happens inside each core.
2. How does it work?
SIMD units are hardware components with their own registers. Packs of data are first loaded into the SIMD registers, then a single instruction is performed on them simultaneously, and the results are stored back to the main memory.
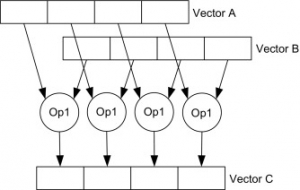
The above figure shows two sets of 4 float(32bit) data loaded in 128bit SIMD registers. There also exists 256bit and 512bit SIMD registers in new CPUs which can load more data and do more operations at the same time.
3. How to use it in your code?
Generally, there are 4 ways to use SIMD. I sort them based on the ease of use and code portability (ascending).
- Write assembly code
It’s more like a suicide! Let’s forget it and see other options.
- Use C/C++ intrinsics
Intel has developed SSE and AVX intrinsics. ARM has developed Neon intrinsics. These are much much better than assembly but makes your code very messy and unreadable. Also, because each CPU vendor has its own set of intrinsics, you have to write your code in multiple versions if you want it to be run on different architectures. We prefer a solution that gives portability: writing one version and running it on all the architectures.
- Use existing libraries
This is the best option. Some nice people have developed SIMD libraries that give us easy-to-use, high-level, and readable functions that can run on all CPUs. OpenCV is one of them :)
- Leave the code to the compiler and let it auto-vetorize the code for you
If you don’t want to get your hands dirty with SIMD, then this is the best option for you. It doesn’t work always but it’s as easy as tweaking some of your compiler flags. For example, if you use GCC, then put -ftree-vectorize, or -O3 in your command. You may be curious to see which parts have been vectorized and which parts have not. GCC provides some flags for this too. It reports both the successful and missed vectorizations. If you think a code block can be vectorized but GCC has not been smart enough to do it for you, then you can guide it by OpenMP SIMD directives.
Okay… Now that you have got familiar with SIMD and the ways to use it, let’s implement a vectorized convolution. I pick the best version of the Gaussian blur in the previous post and vectorize it using the Universal Intrinsics of OpenCV.
4. Gaussian blur with SIMD
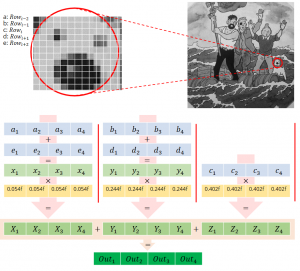
The vertical convolution of the Gaussian blur function can be easily vectorized by this scheme:
The code will change from:
for (unsigned int j=0; j<cols; j++)
    buffer[j] = (input.val[i-2][j]+input.val[i+2][j])*0.054488685f + (input.val[i-1][j]+input.val[i+1][j])*0.24420135f + input.val[i][j]*0.40261996f;
to:
cv::v_float32x4 coef1 = cv::v_setall_f32(0.054488685f);
cv::v_float32x4 coef2 = cv::v_setall_f32(0.24420135f);
cv::v_float32x4 coef3 = cv::v_setall_f32(0.40261996f);

unsigned int j=0;
for (; j<cols; j+=4)
{
    cv::v_float32x4 a = cv::v_load_aligned(&input.val[i-2][j]);
    cv::v_float32x4 b = cv::v_load_aligned(&input.val[i-1][j]);
    cv::v_float32x4 c = cv::v_load_aligned(&input.val[i  ][j]);
    cv::v_float32x4 d = cv::v_load_aligned(&input.val[i+1][j]);
    cv::v_float32x4 e = cv::v_load_aligned(&input.val[i+2][j]);
    cv::v_float32x4 result = ((a+e)*coef1) + ((b+d)*coef2) + (c*coef3);
    cv::v_store_aligned(&buffer[j], result);
}

//leftovers
for (; j<cols; j++)
    buffer[j] = (input.val[i-2][j]+input.val[i+2][j])*0.054488685f + (input.val[i-1][j]+input.val[i+1][j])*0.24420135f + input.val[i][j]*0.40261996f;
Let me explain what happened. We first set Gaussian kernel coefficients via cv::v_setall_f32.Then we load 4 pixels from each row to 128bit registers using cv::v_load_aligned. Then we apply the convolution formula using simple + and * operators. Results are stored in the scalar buffer using cv::v_store_aligned. Since the number of image columns is not necessarily a multiple of 4, there will remain some pixels that cannot be handled by SIMD operations. I have called them “leftovers” and used the non-vectorized convolution for them.
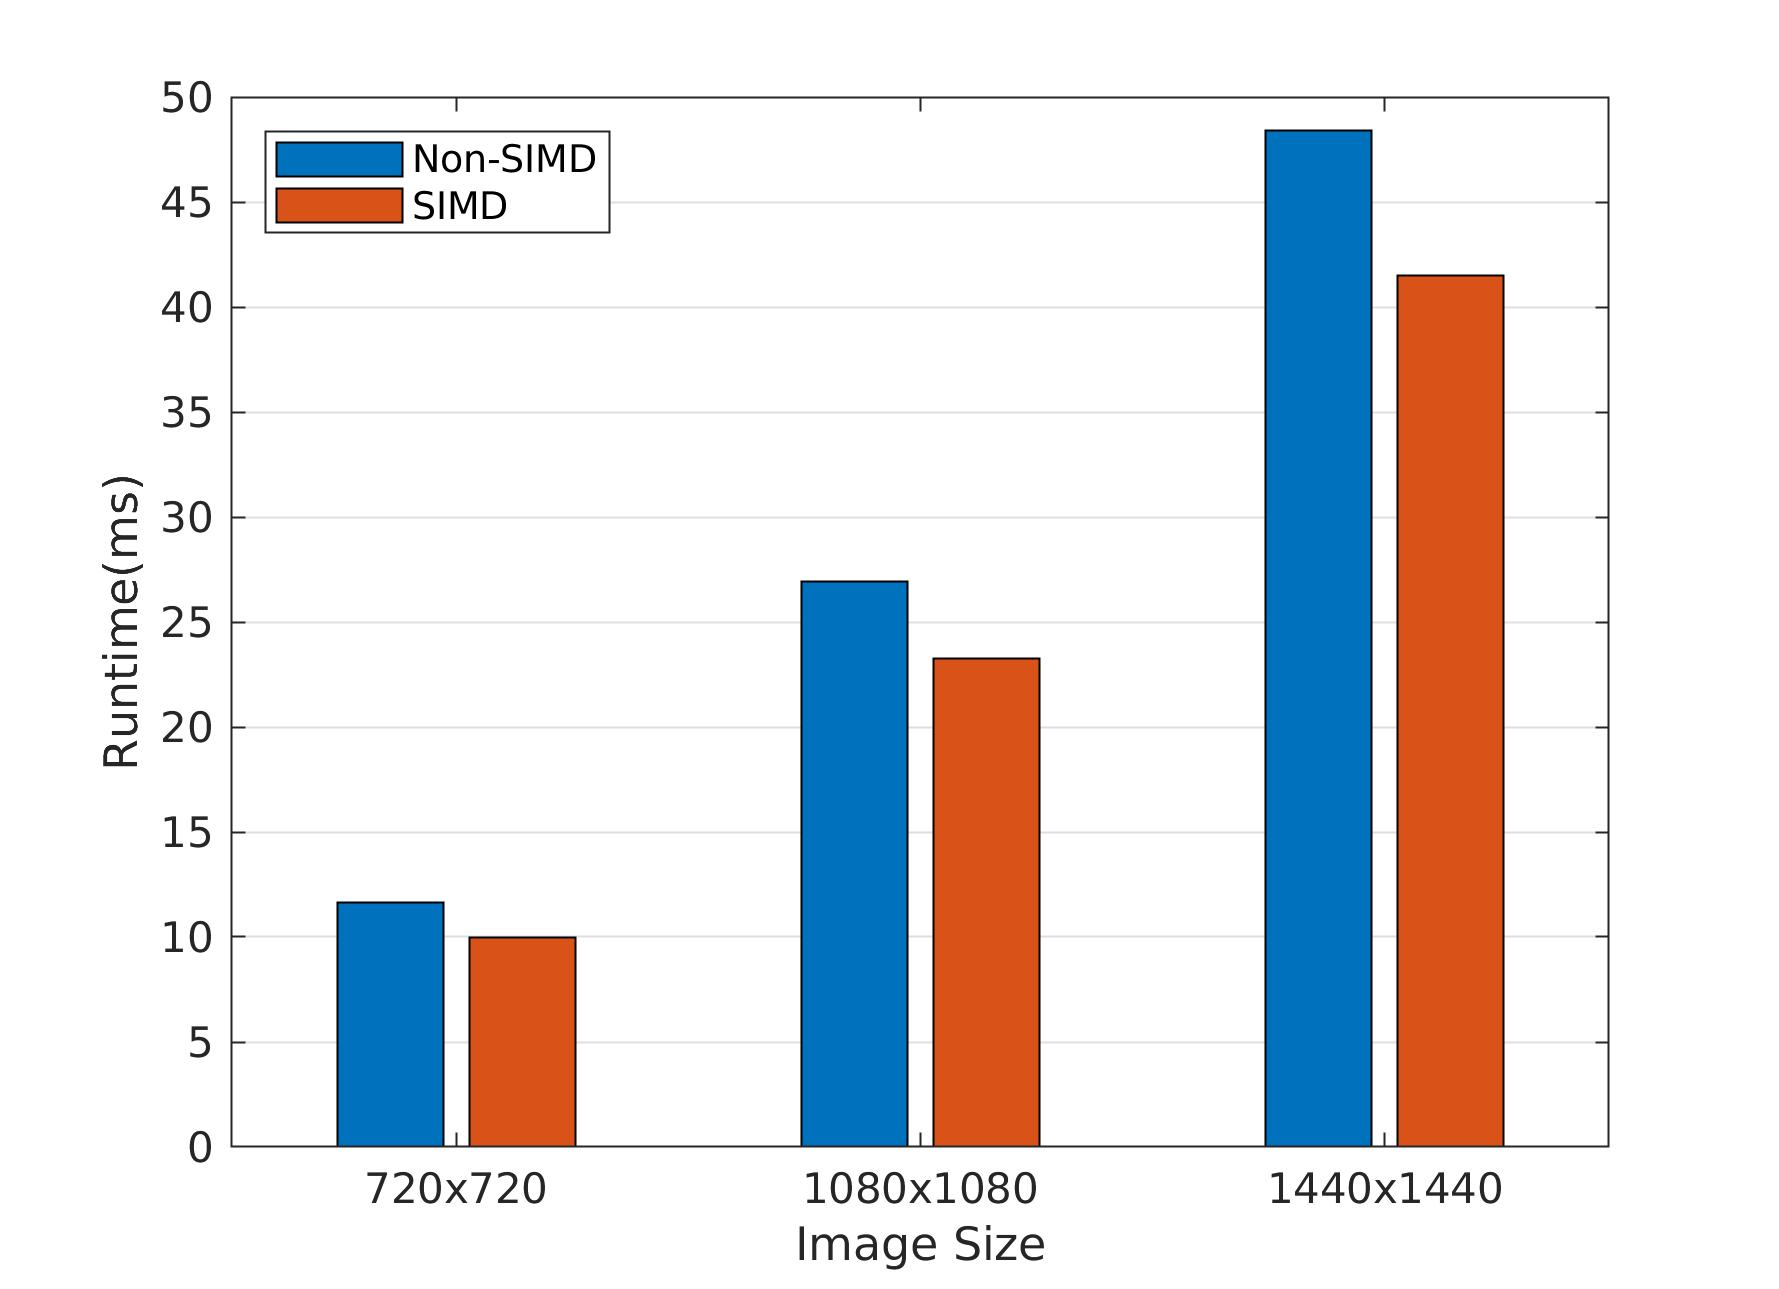
To test the runtime, I compiled the code on a Raspberry Pi 3B+ with Raspbian Stretch and GCC 6.3. See the gain with different image sizes.
5. Summary
-
SIMD provides simultaneous computation inside each CPU core
-
The best way to benefit from SIMD is to first check the blocks of code where the compiler has not vectorized, and then use a SIMD library to vectorize it.
-
OpenCV provides universal intrinsics which can be run on both ARM and x86 architectures. The functions are readable and easy-to-use.
Leave a Reply
Want to join the discussion?Feel free to contribute!
Leave a Reply
Related Posts:
- Advanced tips to optimize C++ codes for computer vision tasks (III): Parallel Processing
- Advanced tips to optimize c++ codes for computer vision tasks (I): Memory Management
- Simple tips for optimizing C++ codes
- Transfer learning for face mask recognition using libtorch (Pytorch C++ API)
- Image classification with pre-trained models using libtorch (Pytorch C++ API)
Hey, Zana,
I downloaded the tutorial code and run the simd code in my x86 PC, got an error ” ‘CV_CPU_HAS_SUPPORT_SSE2’ was not declared in this scope”. I switched to run code on ARM platform, got a similar error ” ‘CV_CPU_HAS_SUPPORT_NEON’ was not declared in this scope”. Do you have any idea to solve it?
Thanks for your reply.
Hi Wei
Sorry for my late reply
For any runtime or compilation error, please make an issue in the Github repo. This way, other users can also see and follow the solution if they face the same issue