Hands on QR Code detection
QR codes can store different types of data. Recently, I was involved in a project that a robot had to detect and decode pre-installed QR codes to refine its position. This post explains how I got 10 FPS performance on a Raspberry Pi Zero.
What is a QR code?
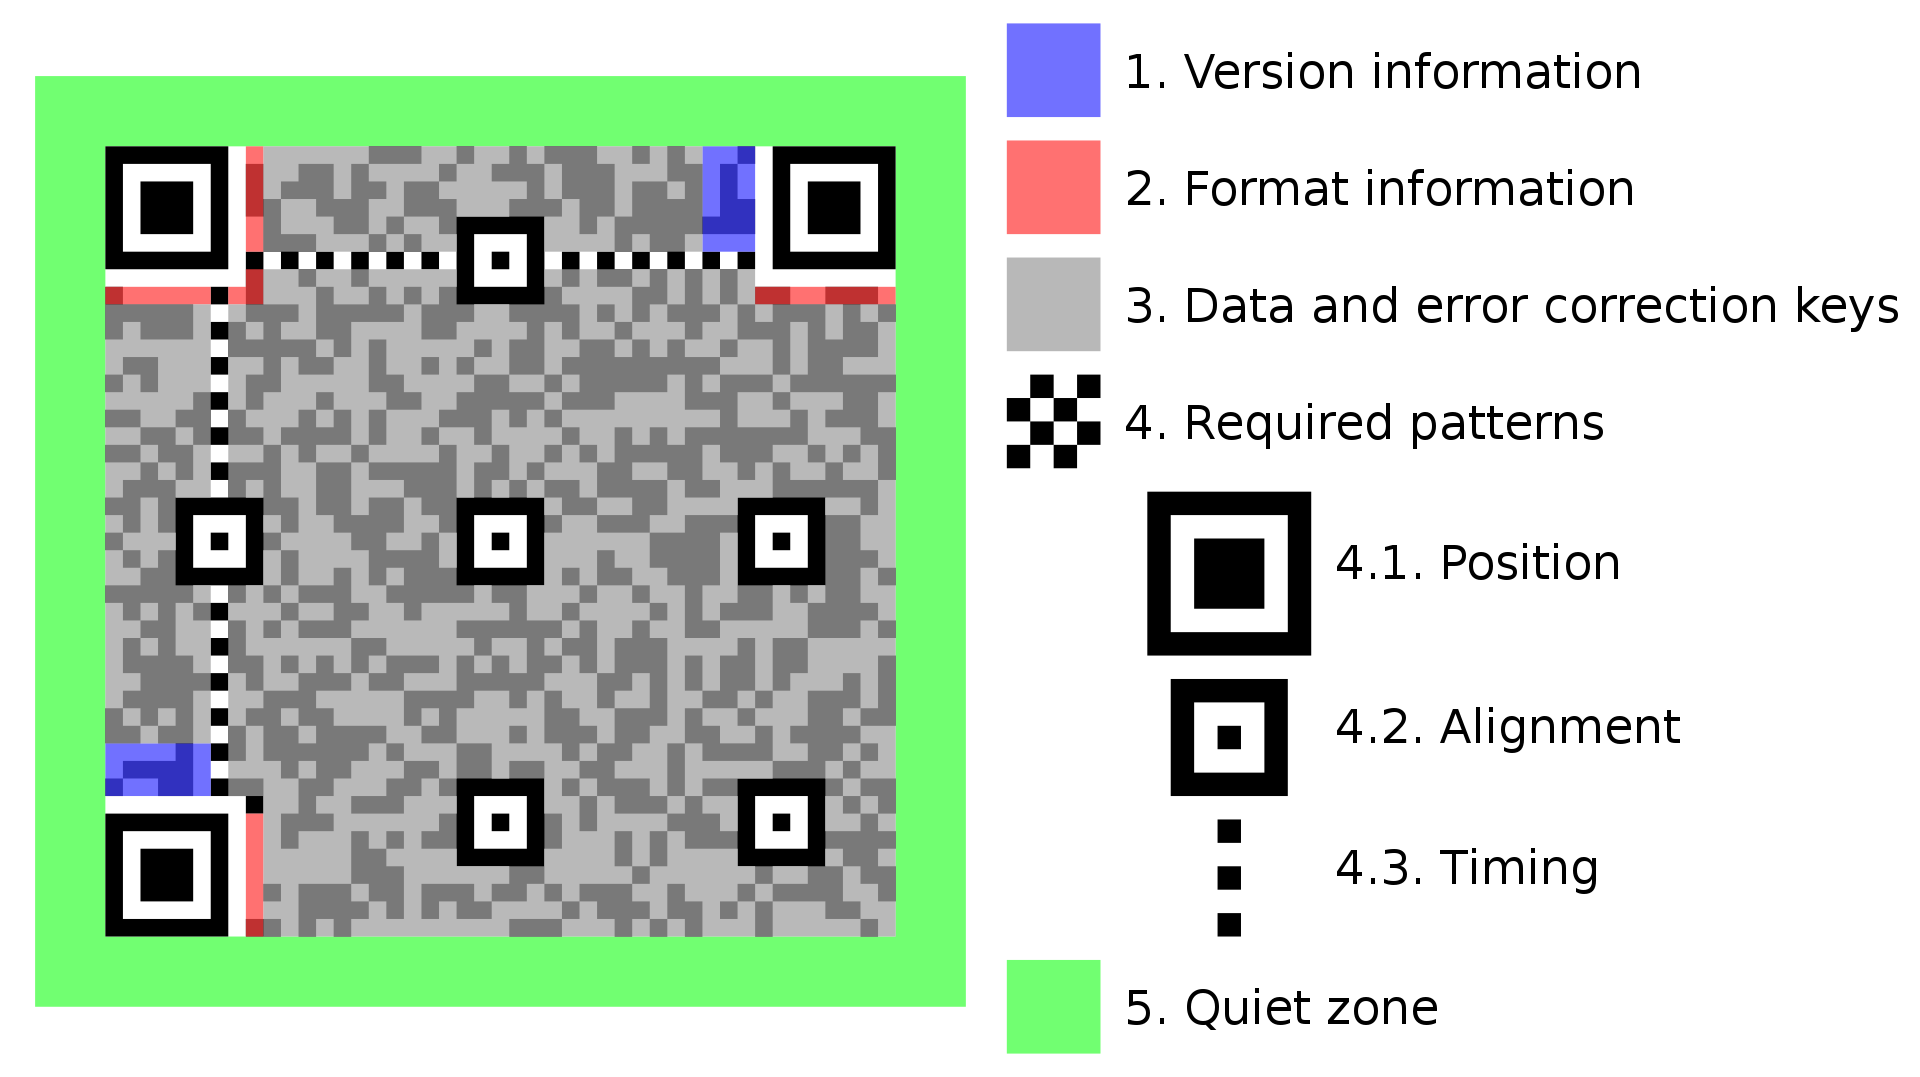
Quick Response codes were first designed in 1994 in Japan. They are often used as shortcuts to websites or videos. Compared to barcodes, they can store hundreds of times more characters and are more robust to damage or partial occlusion due to their error correction mechanism. The following image shows how data is stored in a QR code. For more details, watch this YouTube video.
How to generate QR codes?
If you need few QR codes, then use available online generators such as this one. But this method would be cumbersome if you need tens or hundreds of codes with custom messages. Pyboof provides an easy way to do this. Install it by:
sudo pip3 install pyboof
and then run the following Python script to save 20 QR code images in the blink of an eye:
#!/usr/bin/env python3

import pyboof as pb
import numpy as np
import cv2

# Enable use of memory mapped files for MUCH faster conversion between some python and boofcv data types
pb.init_memmap()

for i in range(20):
    generator = pb.QrCodeGenerator(pixels_per_module=10) #Increase or decrease to change resolution

    message = "http://imrid" + str(i) + ".net/" #Put your own message to be encoded in the QR code
    generator.set_message(message)

    boof_gray_image = generator.generate()

    np_array_image = pb.boof_to_ndarray(boof_gray_image).astype(np.uint8)
    image_name = "QR_Code" + str(i) + ".png"
    cv2.imwrite(image_name, np_array_image)
Which library to use for detection?
There are several libraries for barcode and QR code detection. A simple search in Google lists Zbar, Zxing, OpenCV, BoofCV, etc. Zbar was reported to be faster than OpenCV [link] and Zxing [link]. BoofCV was reported to be even faster than Zbar [link] but my initial experiments with Pyboof (the python wrapper of BoofCV) showed that Zbar works at least two times faster than it. So, I decided to go with Zbar. It is an open-source project developed for fun (like many other great projects). Zbar scans the image in a ZigZag pattern and this is why it has “Z” in its name and logo. It looks for edges using a zero-crossing algorithm. It then binarizes the image using adaptive thresholding and decodes the data inside the QR code.
![]()
Zbar Conventional Install
Most guides on installing Zbar suggest using sudo apt-get install libzbar-dev libzbar0. Assuming that Raspicam [link] and OpenCV have been installed before, g++ main.cpp `pkg-config –cflags –libs opencv` -lraspicam –lraspicam_cv –lzbar will compile the following code which sets the Raspberry Pi’s camera resolution to 640×480 and then feeds the grayscale captured frame to the Zbar scan function.
#include <opencv2/opencv.hpp>
#include <raspicam/raspicam_cv.h>
#include <zbar.h>
#include <time.h>

using namespace cv;
using namespace std;
using namespace zbar;

typedef struct
{
    string data;
    vector<Point>  location;
} decodedObject;


ImageScanner scanner;


//----------------------------------------------------------------------------
//----------------------------------------------------------------------------
void decode(Mat &imGray, vector<decodedObject> &decodedObjects)
{
    Image image(imGray.cols, imGray.rows, "Y800", (uchar *)imGray.data,  imGray.cols *imGray.rows);

    int n = scanner.scan(image);

    for(Image::SymbolIterator symbol = image.symbol_begin(); symbol != image.symbol_end(); ++symbol)
    {
        decodedObject obj;

        obj.data = symbol->get_data();

        for(int i = 0; i< symbol->get_location_size(); i++)
            obj.location.push_back(Point(symbol->get_location_x(i),symbol->get_location_y(i)));

        decodedObjects.push_back(obj);
    }
}


//----------------------------------------------------------------------------
//----------------------------------------------------------------------------
void display(Mat &im, vector<decodedObject> &decodedObjects, int FPS)
{
    for(int i = 0; i < decodedObjects.size(); i++)
    {
        vector<Point> points = decodedObjects[i].location;
        vector<Point> hull; // If the points do not form a quad, find convex hull

        if(points.size() > 4)
            convexHull(points, hull);
        else
            hull = points;

        int n = hull.size();

        for(int j = 0; j < n; j++)
            line(im, hull[j], hull[ (j+1) % n], Scalar(255,0,0), 3);

        rectangle(im, Rect(8,5,200,40), Scalar::all(255), -1);
        putText(im, decodedObjects[i].data, Point(8,30), FONT_HERSHEY_SIMPLEX, 0.7, Scalar(255), 2);
    }

    char text[255];
    sprintf(text, "FPS: %d", FPS);
    putText(im, text, Point(im.cols-100, 20), FONT_HERSHEY_SIMPLEX, 0.7, Scalar(255), 2);

    imshow("Results", im);
}


//----------------------------------------------------------------------------
//----------------------------------------------------------------------------
int main()
{
    clock_t start, finish;

    // Configure scanner
    scanner.set_config(zbar::ZBAR_NONE, zbar::ZBAR_CFG_ENABLE, 0);
    scanner.set_config(ZBAR_QRCODE, ZBAR_CFG_ENABLE, 1);

    raspicam::RaspiCam_Cv Camera;
    Camera.set( CV_CAP_PROP_FORMAT, CV_8UC1 );
    Camera.set( CV_CAP_PROP_FRAME_HEIGHT, 480 );
    Camera.set( CV_CAP_PROP_FRAME_WIDTH, 640 );
    Camera.set( CV_CAP_PROP_FPS, 30 );
    Camera.open();

    for(;;)
    {
        start = clock();
        Mat image;
        Camera.grab();
        Camera.retrieve (image);

        if (image.empty())
            break;

        // Variable for decoded objects
        vector<decodedObject> decodedObjects;

        // Find and decode barcodes and QR codes
        decode(image, decodedObjects);

        finish = clock();
        int FPS = 1000/(1000*(finish-start)/CLOCKS_PER_SEC);

        // Display location
        display(image, decodedObjects, FPS);

        if (waitKey(1)=='q')
            break;
    }

    Camera.release();

    return 0;
}
Raspberry Pi Zero runs this code at 3 FPS.
Zbar Accelerated Install
3 FPS was too slow for me. So I decided to find a quick way to get more speed from it. What if I could download Zbar’s source code and build it with customized GCC flags? I tried the following steps and it worked :)
- Download and extract Zbar
wget http://downloads.sourceforge.net/project/zbar/zbar/0.10/zbar-0.10.tar.bz2
tar xvf zbar-0.10.tar.bz2
- Set the customized compiler flags and configure the installation. Zbar can work with Qt, Pygtk, and ImageMagick which I didn’t need. I also disabled the installation of Zbarcam because it works with V4L1 which is deprecated in current versions of Linux.
cd zbar-0.10/
export CFLAGS="-I/usr/local/include -march=armv6 -mfloat-abi=hard -mfpu=vfp -O3"
./configure --without-qt --without-gtk --without-python --without-imagemagick --enable-video=no
- Install the Zbar
make
sudo make install
sudo ldconfig
The code could run 3 times faster with this simple trick.
Leave a Reply
Want to join the discussion?Feel free to contribute!